1) Create a new web application (e.g. http://mossdev1:25000/)
2) Inspect Managed Paths for the new web application. You should already have:
(root) - Explicit inclusion
sites - Wildcard inclusion
3) Delete managed paths:
sites - Wildcard inclusion
4) Create managed paths:
personal - Wildcard inclusion
mysite - Explicit inclusion
5) End state for managed paths should be:
(root) - Explicit inclusion (thanks to imsaurabh for catching this!)
personal - Wildcard inclusion
mysite - Explicit inclusion
6) Create a site collection at /mysite/ managed path. This will use a My Site Host template:
Choose correct web application (e.g. http://mossdev1:25000/)
Title: My Site Host (doesn’t matter, really)
URL: http://mossdev1:25000/mysite (no fill-in because path is explicit in managed paths)
Template: Enterprise (tab) -> My Site Host
Specify primary and secondary administrators.
Click OK.
7) Create a blank site collection at the / managed path to enable self-service site creation:
Choose correct web application (e.g. http://mossdev1:25000/)
Title: Blank site (doesn’t matter, really)
URL: http://mossdev1:25000/ (no fill-in because path is explicit in managed paths)
Template: Collaboration (tab) -> Blank Site
Specify primary and secondary administrators.
Click OK.
8) Enable Self-Service Management. Choose from Application Management -> Application Security.
Now that you’ve created the host, here’s how to make sure it works properly in the SSP’s My Site Settings:
1) Navigate to My Site Settings (go to your SSP’s admin pages, it’s the 3rd link in the 1st section).
a) For form’s sake, inspect the Preferred Search Center entry. This URL should end in /SearchCenter/Pages/.
Set Personal Site Services to http://mossdev1:25000/mysite/. Note that this points to the URL for the explicit inclusion path and My Site Host Template site collection you created above.
b) Set Personal site Location into just personal. Note that this points to the URL (after SharePoint puts context to it) for the Wildcard inclusion managed path you created above.
c) Choose the 2nd Site Naming Format: User name (resolve conflicts by using domain_username).
d) Enable Allow user to choose the language of their personal site.
e) Disable My Site to support global deployments.
f) Default Reader Site Group: NT AUTHORITY\authenticated users.
Friday, May 6, 2011

Tuesday, December 21, 2010
SharePoint Server 2010 capacity management: Software boundaries and limits
Please refer the following site to get more details.
http://technet.microsoft.com/en-us/library/cc262787.aspx#UPA
http://technet.microsoft.com/en-us/library/cc262787.aspx#UPA
Monday, November 22, 2010
Workflow Links
This are the good links available for workflows,
http://blogs.msdn.com/b/sharepoint/archive/tags/workflow/
For creating State machine workflow
http://blogs.msdn.com/b/sharepoint/archive/tags/workflow/
Integrating infopath with workflows
http://nisha081.spaces.live.com/Blog/cns!6F578843FD095913!1265.entry
http://blogs.msdn.com/b/sharepoint/archive/tags/workflow/
For creating State machine workflow
http://blogs.msdn.com/b/sharepoint/archive/tags/workflow/
Integrating infopath with workflows
http://nisha081.spaces.live.com/Blog/cns!6F578843FD095913!1265.entry
Wednesday, November 3, 2010
How to access web.config in timer job code
This is common scenario where some times we may need to access the web.config file in sharepoint custom timer job. But timer job is running under OWSTIMER.EXE, but sharepoint is running under the context of w3wp process, So its difficult to access the web.config file in the timer job code. To overcome this we need to create the instance of the webapp and Configuration and then we can access the web config file.
Below is the sample snippet code where we can access the web.config file.
//Get the instance of the current webapplication
SPWebApplication webApp = this.Parent as SPWebApplication;
//Create the webconfig instance by using web application name
Configuration webconfig = WebConfigurationManager.OpenWebConfiguration("/", webApp.Name);
//Get the configured value from web config using the key value in my case its "MYKEY"
string appValue = webconfig.AppSettings.Settings["MYKEY"].Value.ToString();
The above code needs to written in Execute method of the timer job definition file.
Below is the sample snippet code where we can access the web.config file.
//Get the instance of the current webapplication
SPWebApplication webApp = this.Parent as SPWebApplication;
//Create the webconfig instance by using web application name
Configuration webconfig = WebConfigurationManager.OpenWebConfiguration("/", webApp.Name);
//Get the configured value from web config using the key value in my case its "MYKEY"
string appValue = webconfig.AppSettings.Settings["MYKEY"].Value.ToString();
The above code needs to written in Execute method of the timer job definition file.
Monday, November 1, 2010
Updating Master Page and Page layout
Updating MAster page and page layout through feature receiver
http://narunkumar.wordpress.com/2010/06/25/updating-a-sharepoint-master-page-page-layout-via-a-solution-wsp/
http://narunkumar.wordpress.com/2010/06/25/updating-a-sharepoint-master-page-page-layout-via-a-solution-wsp/
Thursday, October 21, 2010
Infopath form services in sharepoint 2010
Some times Infopath form services are not available in sharepoint(2010) under general application settings in central admin.
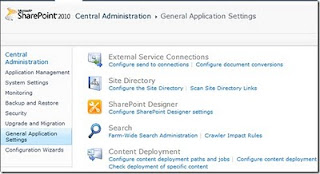
How to get this links?
Follow this steps to get the infopath form services in sharepoint cetral admin.
1) Install the feature "IPFSAdminWeb" either by using stsadm or PS(Powershell)
2) After this feature is installed the infopath form services will be availabel, if this feature is not available then we need to activate this feature explicitly in sharepoint central admin. This can be done through stsadm or PS.
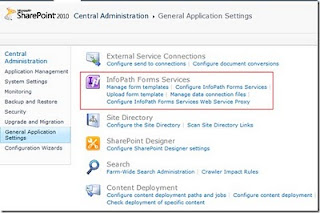
3) If everything works fine then well and good but some times when we click on infopath form services then we will get the page not found error.
Then there should sharepoint version problem. If sharepoint Client Access License is installed then this will cause the problem.
4) How to change the version
Open SharePoint Central Administration and went to the (i.e. upgradeandmigration.aspx on the Central Admininstration site).
In the "Upgrade and Patch Management" section click on the "Convert farm license type" link to bring up the Conversion.aspx page.
Enter in the new product key and convert to the "SharePoint Server with Enterprise Client Access License" edition.
Now go back to the General Application Settings page in SharePoint Central Administration and you should now see the "InfoPath Forms Services" section with its links.

How to get this links?
Follow this steps to get the infopath form services in sharepoint cetral admin.
1) Install the feature "IPFSAdminWeb" either by using stsadm or PS(Powershell)
2) After this feature is installed the infopath form services will be availabel, if this feature is not available then we need to activate this feature explicitly in sharepoint central admin. This can be done through stsadm or PS.

3) If everything works fine then well and good but some times when we click on infopath form services then we will get the page not found error.
Then there should sharepoint version problem. If sharepoint Client Access License is installed then this will cause the problem.
4) How to change the version
Open SharePoint Central Administration and went to the (i.e. upgradeandmigration.aspx on the Central Admininstration site).
In the "Upgrade and Patch Management" section click on the "Convert farm license type" link to bring up the Conversion.aspx page.
Enter in the new product key and convert to the "SharePoint Server with Enterprise Client Access License" edition.
Now go back to the General Application Settings page in SharePoint Central Administration and you should now see the "InfoPath Forms Services" section with its links.
Tuesday, August 3, 2010
Code deployment in sharepoint 2010
There are basically now three different ways to deploy custom assemblies:
•Full trust solutions - The assemblies are registered in the GAC and runs under full trust
•Partial trust solutions - The assemblies are deployed to the bin folder of a specific Web Application
•Sandboxed solutions - The assemblies (solutions) are deployed to the Site Collection gallery
Sandboxed Solutions
The Sandboxed Solutions runs inside the a special service, called Microsoft SharePoint Foundation Sandboxed Code Service, which is a completely and separate application domain than the SharePoint application pools. The Sandboxed solutions are monitored and if they consume to much resources or fails to many times SharePoint automatically shuts the solution down. The code running in a Sandboxed assembly does not have access to the full SharePoint API, basically it's just the classes from Site Collection level and below. The sandbox is also protected with a very minimal CAS policy which for example prohibits the user code solutions from calling web services, making database calls or accessing the file system.
Sandboxed solutions are deployed into the Solution gallery of a Site Collection and only access that Site Collection. They can be deployed without having any downtime of the farm or web application. Anyone within the Site Collection Administrators group can upload solutions to the gallery and activate them. Farm administrators controls how much resources each Sandbox can use and can also block specific solutions from running at all.
Pros Cons
Can easily be deployed by Site Collection Administrators Very limited CAS policy
Resource usage is monitored * Current uncertainty about the monitoring stability
Secure Hard to deploy in a farm
Great support in Visual Studio 2010
Only crashes the Sandbox if it blows
There is a timer job which is running every 15 minutes to check the resource usage. Based on this timer job it will block the solution from running.
Farm Solutions
The Farm solutions or full trust solutions adds the assembly to the Global Assembly Cache, GAC, which means that they can run without any CAS policies, i.e. under full trust. The assemblies can be accessed from any application in the farm. Full-trust solutions are the most common way to install solutions since it is easy and requires no knowledge of for instance CAS policies. The code running in a full trust solution has the same access as the application pool account to the local server and can do almost what it want with the server. Deploying Farm solutions should only be done with code that we really trust.
Only farm administrators can upload new farm solutions to the configuration database and most often an application pool recycle is needed, especially when updating solutions.
Pros Cons
Easy to implement Only Farm Administrators can add new solutions
Great support in Visual Studio 2010 Downtime when updating
Runs in full trust Have to much privileges
Can crash the whole server
Web Application Solutions
Solutions deployed to the web application bin directory was the way to go in SharePoint 2007 when we wanted/needed to secure our application using CAS. This partial trust option is still valid in SharePoint 2010. Web application deployed solutions by default only have a very minimal CAS policy applied. Using custom CAS policies it is easy to give more privileges to assembly. Installing these solutions also requires a Farm Administrator but they are only applied to specific Web Applications. Updating the assembly does not require an application pool recycle.
Visual Studio 2010 have support for Web Application deployment but not for custom CAS policies. We have to install the solution using PowerShell or create our own Visual Studio SharePoint Deployment Steps.
Pros Cons
Security policies can be configured and kept minimal Only Farm Administrators can add new solutions
Minimal downtime when upgrading No support OOB for custom CAS policies in Visual Studio 2010
Only crashes the web application
•Full trust solutions - The assemblies are registered in the GAC and runs under full trust
•Partial trust solutions - The assemblies are deployed to the bin folder of a specific Web Application
•Sandboxed solutions - The assemblies (solutions) are deployed to the Site Collection gallery
Sandboxed Solutions
The Sandboxed Solutions runs inside the a special service, called Microsoft SharePoint Foundation Sandboxed Code Service, which is a completely and separate application domain than the SharePoint application pools. The Sandboxed solutions are monitored and if they consume to much resources or fails to many times SharePoint automatically shuts the solution down. The code running in a Sandboxed assembly does not have access to the full SharePoint API, basically it's just the classes from Site Collection level and below. The sandbox is also protected with a very minimal CAS policy which for example prohibits the user code solutions from calling web services, making database calls or accessing the file system.
Sandboxed solutions are deployed into the Solution gallery of a Site Collection and only access that Site Collection. They can be deployed without having any downtime of the farm or web application. Anyone within the Site Collection Administrators group can upload solutions to the gallery and activate them. Farm administrators controls how much resources each Sandbox can use and can also block specific solutions from running at all.
Pros Cons
Can easily be deployed by Site Collection Administrators Very limited CAS policy
Resource usage is monitored * Current uncertainty about the monitoring stability
Secure Hard to deploy in a farm
Great support in Visual Studio 2010
Only crashes the Sandbox if it blows
There is a timer job which is running every 15 minutes to check the resource usage. Based on this timer job it will block the solution from running.
Farm Solutions
The Farm solutions or full trust solutions adds the assembly to the Global Assembly Cache, GAC, which means that they can run without any CAS policies, i.e. under full trust. The assemblies can be accessed from any application in the farm. Full-trust solutions are the most common way to install solutions since it is easy and requires no knowledge of for instance CAS policies. The code running in a full trust solution has the same access as the application pool account to the local server and can do almost what it want with the server. Deploying Farm solutions should only be done with code that we really trust.
Only farm administrators can upload new farm solutions to the configuration database and most often an application pool recycle is needed, especially when updating solutions.
Pros Cons
Easy to implement Only Farm Administrators can add new solutions
Great support in Visual Studio 2010 Downtime when updating
Runs in full trust Have to much privileges
Can crash the whole server
Web Application Solutions
Solutions deployed to the web application bin directory was the way to go in SharePoint 2007 when we wanted/needed to secure our application using CAS. This partial trust option is still valid in SharePoint 2010. Web application deployed solutions by default only have a very minimal CAS policy applied. Using custom CAS policies it is easy to give more privileges to assembly. Installing these solutions also requires a Farm Administrator but they are only applied to specific Web Applications. Updating the assembly does not require an application pool recycle.
Visual Studio 2010 have support for Web Application deployment but not for custom CAS policies. We have to install the solution using PowerShell or create our own Visual Studio SharePoint Deployment Steps.
Pros Cons
Security policies can be configured and kept minimal Only Farm Administrators can add new solutions
Minimal downtime when upgrading No support OOB for custom CAS policies in Visual Studio 2010
Only crashes the web application
Subscribe to:
Posts (Atom)