$webApp=get-SPWebApplication "http://sharepointblog"
foreach ($SPSite in $webApp.Sites)
{
#Here we are looping through all the web under site collection
foreach($SPWeb in $SPSite.AllWebs)
{
#Cleaning the 1st Stage of Recycle bin items
$SPWeb.RecycleBin.DeleteAll();
#Moving the all the items to 2nd stage level
$SPWeb.RecycleBin.MoveAllToSecondStage();
}
#Clean SharePoint site collection
$SPSite.RecycleBin.DeleteAll();
}Monday, February 1, 2021
Powershell script for cleaning Recycle bin
Tuesday, January 26, 2021
Powershell script for creating SharePoint Site/Subsite
Note: Before going through the please go through my first post in power shell series which convers how to use PS scripts.
Below is the syntax and example to create the site using PowerShell script.
New-SPWeb _URL<Here we need to replace it with site URL> -name <Name of the sub site> -template <Site template need to be used while creating>
Example:
New-SPWeb –Url "http://blogspot/SubSite" -Name "Subsite" -template STS#0
Sunday, January 24, 2021
PowerShell script for creating site collection in Sharepoint
New-SPSite –Url <URL of the site collection>
-Name <Site collection name>
-OwnerAlias <Site collection administrator>
-Template <In which template site needs to be created like blog, team etc>New-SPSite "http://blogpost/sites/test" -OwnerAlias "blogpost\spadmin" -Language 1033 -Template STS#0PowerShell script for creating web application in Sharepoint
In this blog post we will use PowerShell script for creating new web application in SharePoint. We can create web application from SharePoint central admin site as well, this is another way of creating the web application.
Note: Before going through the please go through my first post in power shell series which convers how to use PS scripts.
Below is the script for creating the application, here 1st script refers to generic script where you can replace with your own value as per requirement.
New-SPWebApplication –ApplicationPool <Application pool name> -Name <Web app name> -ApplicationPoolAccount <service account for the application pool> -Port <port number>Below is the sample script for creating web app by internal host header with sharepoint.blogspot.com and public url with http://www.blogspot.com
New-SPWebApplication -Name "BlogSite" -Port 80 -HostHeader sharepoint.blogspot.com -URL "http://www.blogspot.com" -ApplicationPool "SharepointBlogspot" -ApplicationPoolAccount (Get-SPManagedAccount "blogspot\spadmin")We can create web application with claim based authentication enabled for that we need to use below script.
$authprovider = New-SPAuthenticationProvider
New-SPWebApplication -Name "BlogSite" -Port 443 -URL "https://www.blogspot.com" -ApplicaitonPool "SharepointBlogSpot" -ApplicationPoolAccount (Get-SPManagedAccount "blogspot\spadmin") -AuthenticationProvider $authprovider -SecureScoketLayer
Thursday, January 21, 2021
Powershell scripts for getting Sharepoint System account
In this post we will try to get all the service account details in SharePoint environment. Before proceeding further in case if you are new to PowerShell make sure you visit this blog post to understand how to set up or how to start using PowerShell ISE.
There is cmdlet called SPProcessAccount which helps in getting all the required account details.
Local System account details
Get-SPProcessAccount –LocalSystem
LocalService account:
Get-SPProcessAccount –LocalService
NetworkService account:
Get-SPProcessAccount –NetworkService
Tuesday, January 19, 2021
SharePoint build version using PowerShell
In this blog post will discuss about how to get the Sharepoint build version from PowerShell script.
Before that there are many ways we can get the Sharepoint build version, this is one of the reliable way to get the build version.
We can get build version using SQL queries but as per MS recommendation we should avoid connecting to Sharepoint DB, in a way we can avoid using this
Another way is using file system, again its not reliable about the build version we can get which version of Sharepoint like is it 2010, 2013 or etc. Using the Microsoft.Sharepoint.dll version number located in respective folder we can get but there will be always chance the number will vary depending Service Pack or CU updates
Using Registry we can find the build number but again this is not reliable as CU update doesn't reflect the build number in Registry hence we can't use this.
Another reliable way is using Sharepoint central administration, from their we will get the version exact version of the Sharepoint product installed.
As scope of this post is PowerShell we will use PS to get the Sharepoint installed version.
Note: Before going through the please go through my first post in power shell series which convers how to use PS scripts.
Add-PSSnapin "Microsoft.SharePoint.PowerShell"
get-spfarm | select BuildVersionOr simply we can use
(Get-SPFarm).BuildVersionPowerShell script for changing the site logo
In this post we will go through the PowerShell script for updating or I can say changing the sharepoint site logo. Even though its pretty simple activity which we can perform it from UI, but using PS script will make us more comfortable once we used to it.
Note: Before going through the please go through my first post in power shell series which convers how to use PS scripts.
Below is the very simple script for updating the logo of the site.
$web = Get-SPWeb "http://sharepoint2013”
$web.SiteLogoUrl = "http://sharepoint2013/publishingimages/logo.png"
$web.SiteLogoDescription = "Sharepoint 2013 Logo"
$web.Update()Monday, January 18, 2021
Change sharepoint site title and Description using Powershell
Here I am adding few PowerShell scripts in the upcoming blog post which all Sharepoint developer/admin will be using frequently. In each post I will add only code snippet in powershell so it will be easy to learn and remember Ashwell.
In this post I will provide the script to change the site title and description of the site.
Before that I want to make sure I am using Windows powershell ISE to run the script. We have option to run the script from VS code also.
Default location of PowerShell ISE will be available at the below location:
<%SystemRoot%>\System32\WindowsPowerShell\v1.0\PowerShell.exe
The discussion we are using here is meant for sharepoint 2013/16/19 not with Sharepoint Online(there is different way of using powershell for online and it will be discussed later)
As soon as we install sharepoint in the server, Powershell cmdlets available in the Management shell, here we dont need to install any other package to start working with this.
Note: All the required PS(Powershell) cmdlets will be available in Microsoft.SharePoint.PowerShell.dll
We can connect to sharepoint site, either using Sharepoint Management shell or Windows Powershell ISE(WPISE), if we are using WPISE then we need to register Microsoft.SharePoint.PowerShell.dll module for SharePoint Server cmdlets other wise we can skip this part.
Steps to add Snapin:
Add-PSSnapin Microsoft.SharePoint.PowerShellNote: This needs to be added at the starting of the script, so that we wont get any error while executing the scripts:
Also there is another way we can register this as below(this is kind of good practice to follow)
$spSnapin = Get-PSSnapin | Where-Object {$_.Name -eq 'Microsoft.SharePoint.PowerShell'}
if ($spSnapin -eq $null) {
Add-PSSnapin Microsoft.SharePoint.PowerShell
}In the above script we are making sure if the snapin is already available or not.
Who can run the script:
User who is running the script should have securityadmin role membership in SQL box also user should be part of Admin group.
How to open Sharepoint Management shell/Power ISE?
Its always good practice to open/run the shell with administration mode(run as admin)
Below is the script used to change the title and description of the site.
$Web= Get-SPWeb "http://sp2013"
$Web.Title = "Sharepoint 2013 Site"
$Web.Description = "Team site for Development"
$web.Update()Tuesday, October 27, 2020
Add polls to Microsoft Teams meeting
In this article we will use Microsoft Teams meeting to insert poll before we close the team meetings.
Microsoft Teams alone is not sufficient to achieve this functionalities. We need Microsoft forms in order to achieve the same.
Using these 2 tools we can create Survey, Quizzes as well as Poll. MS teams doesn't have in built functionality to insert Poll. By using the below steps we can achieve this vert easily.
1) Open Microsoft Team and open calendar in the teams
2) Select any of the upcoming meeting where you want to insert the poll
3) Now join the meeting where poll needs to be inserted
4) Once we join the meeting minimize the meeting window and open new web browser and login to office.com. Now login into office.com with the same account which configured with Teams.
5) After successful login we will be landing into office.com user dash board as like below.
6) In the landing page if we are not able to see Microsoft Forms by default, click on All apps and this will take us to All Apps view.
Note: Step no 4,5,6 can be skipped by directly logging into forms.office.com
7) In that view we should be able to see Forms which can be used to create Quiz, Polls and surveys.
8) On click of MS forms will open forms page where we can see 2 option, create survey/quiz from blank form or we can chose existing template to create the quiz/survey. This is completely left to us how we want to set up the data.
9) In this article we will create form to chose the goodies for the team. Create new form and give the proper title for the form. Here what ever the options we need we can choose here it might be choice, long text, number etc.
10) Once all the questionaries' are ready click on Share button which is at the top most right corner of the page as shown below.
11) Now copy the URL and keep it handy which we need to use it in later part. There are various option available like QR code or even we can email the link. But for now we will just copy and keep it handy for further use in MS teams.
12) Now open the MS teams meeting and click on conversation and paste the URL which copied from the MS forms. Once we send the url the participant of the meeting can take the poll and fill the details.
Its always instant result we can seen in the responses.
The content published/images used are valid as on 27th October 2020, as MS will keep on updating the way we can create the polls.
Saturday, August 1, 2020
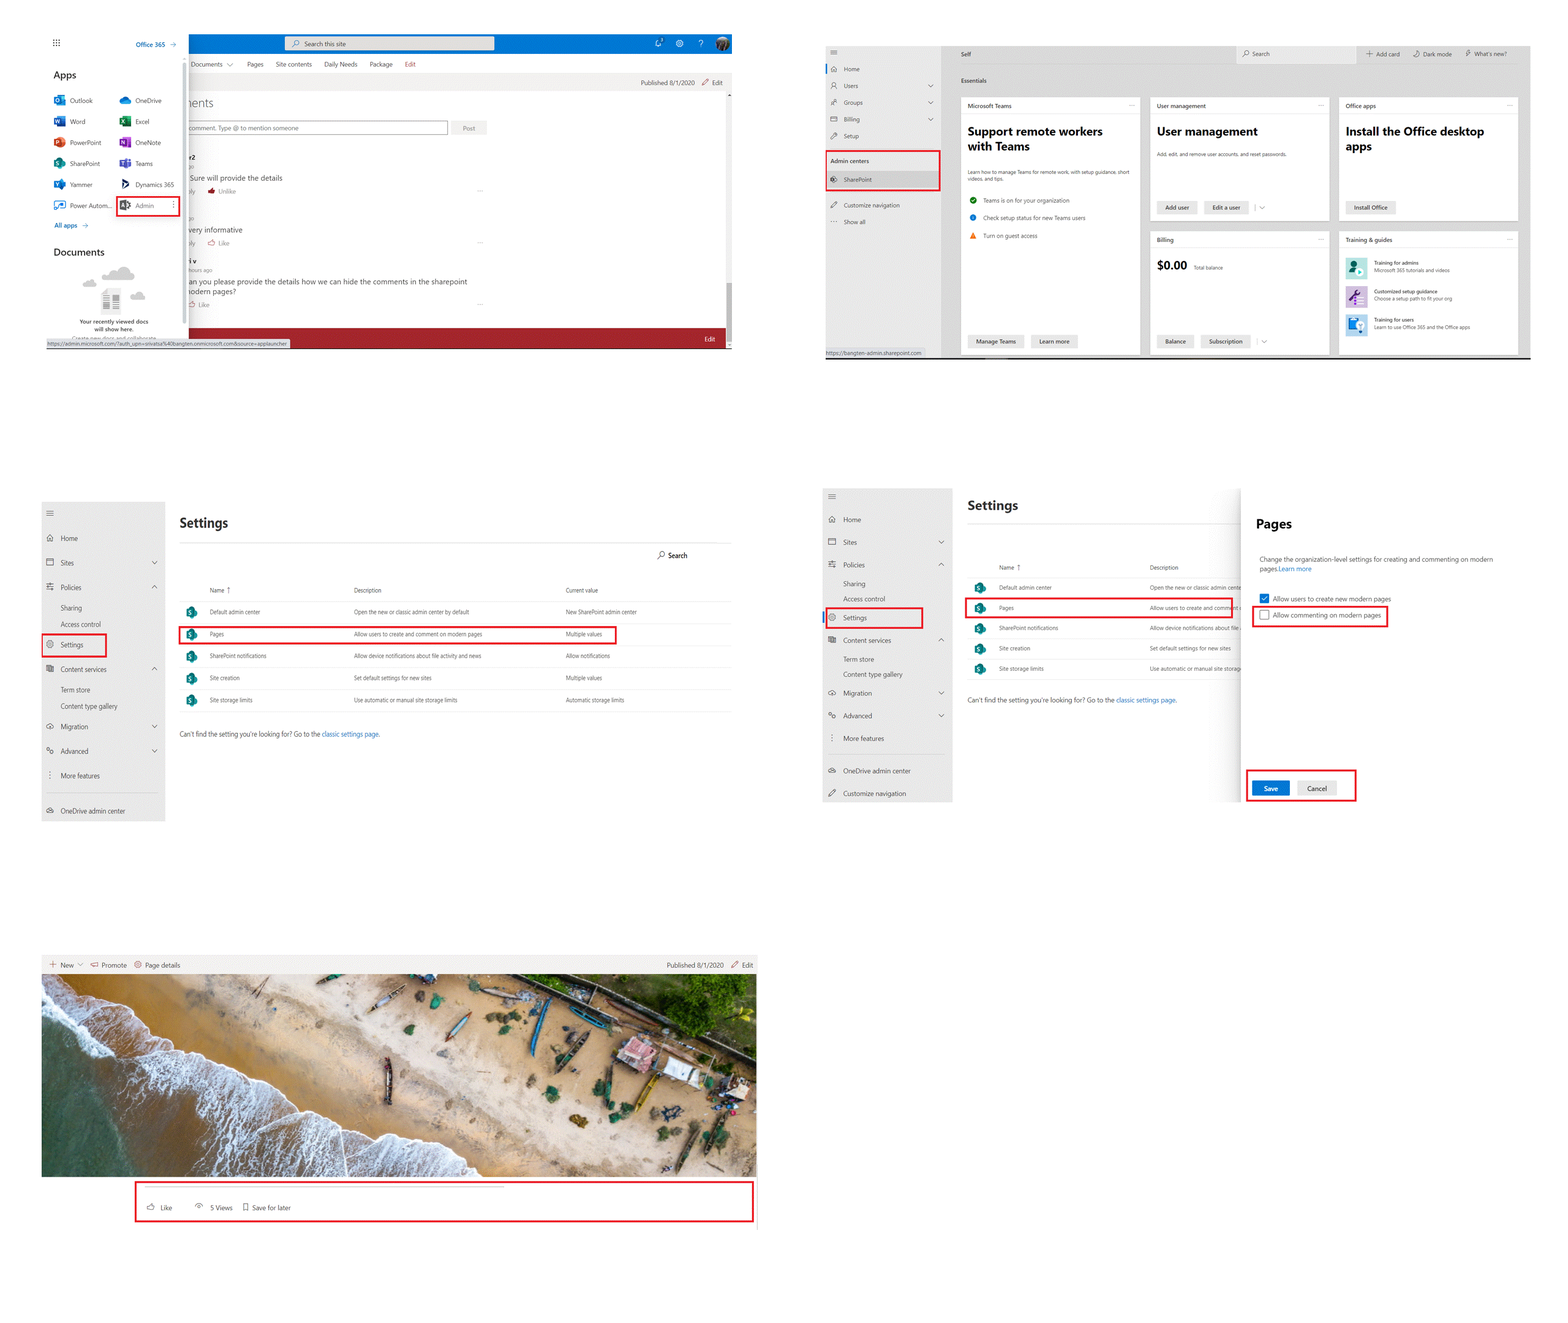
Ways to disable Sharepoint Online Modern Page Comments
Most of the customers keep on asking SharePoint developer to make their page more interactive or kind of seeking opinion about the articles they published in the SharePoint intranet site.
This feature was not available out of the box in earlier version of SharePoint. To achieve this functionality, we need to build custom feature/component which most of the time causes page load issue or performance issue when it grows bigger.
There are two ways we can disable the comments in the page
- Global Scope
- Page Scope
Global scope:
- Open SharePoint admin center
- Click Settings in SharePoint admin center
- Navigate to Comments section in the page, by default Comments will be enabled for all pages.
- Change the radio button as per the requirement (Disable to remove the comments from the page globally)
Note:
- Changing this option will take minimum 15 minutes to reflect in the pages
- Once global admin disables this option, then Site Owner or Site Member can’t enable back at the site collection level
- Disabling the comments history does not remove the comments added earlier. After enabling it back it will be show again.
The whole steps are depicted in the below picture.

Page scope:
- Click Edit button in the page
- Navigate to the bottom of the page where comments control/section is present
- Toggle the button to off position and automatically comments will be hidden
- Republish the page
Note:
- Disabling the comments history does not remove the comments added earlier. After enabling it back it will be show again
- Users with Contribute/Edit access can enable the comments in the page.
The information provided in this post (images and steps) are taken on 1st August 2020.
Thursday, July 30, 2020
Remove Page Header in SharePoint online Pages
There are 2 ways we can achieve the hiding page header.
1) Page level - In this case we will focus only on hiding the page header for the specific page.
Now we will see how we can disable for specific page.
1) Open SharePoint management shell (Run as admin)
#Declare variables sunch as Page name, Site URL
$SiteUrl = "https://bangten.sharepoint.com"
$PageTitle = "TestPage"
#UseWebLogin Uses Default Browser Authentication incase
#if we have not connected we can remove that
Connect-PnPOnline -Url $SiteUrl -UseWebLogin
#Here we are setting the Layout type to Home its kind of landing page
Set-PnPClientSidePage -Identity $PageTitle -LayoutType Home
#Later at any point of time if we want Page Header back then use the below script
#Set-PnPClientSidePage -Identity $PageTitle -LayoutType Article

Now we will see how we can disable at site level
1) Open sharepoint management shell(Run as Admin)
#Declare variables sunch as Page name, Site URL
$SiteUrl = "https://bangten.sharepoint.com"
Connect-PnPOnline -Url $SiteUrl -UseWebLogin
$PageCollection = (Get-PnPListItem -List SitePages).FieldValues
#Here we will loop through site pages collection and set the layout
foreach($Page in $pageCollection){
Set-PnPClientSidePage -Identity $Page.FileLeafRef -LayoutType Home
#Using below line we can revert the changes
#Set-PnPClientSidePage -Identity $Page.FileLeafRef -LayoutType Article
}
Wednesday, July 29, 2020
SharePoint Hub Sites Overview
- Hierarchical structure
- Look and Feel
- Common/Shared Top Navigation
(Global Navigation)
- Scoped Enterprise Search
- Content Aggregation
Who can create SharePoint Hub Site?
How we can create the hub sites?
Here we are performing the following steps:
From the above steps we have associated all the newly created site as hub sites under Parent site
Saturday, March 9, 2019
A timeout has error occured while invoking commands in sharepoint host process
Then I created the package and deployed the solution with powershell script and it went fine, its the time to activate the feature which was giving trouble. First I tried to activate the feature with PS and its worked fine, then deactivated and later tried with UI just to make sure if it breaks out. But no surprises, the feature activated with out any issue.
Now its the time to trouble shoot why its failing in VS2013. Then I started looking into MSDN links and found out there is Registry key called "ChannelOperationTimeout" which take care of time out issue in VS. If we have more feature activation code needs to be executed in during deployment from VS it will break out. Default value set to 120 sec, ideally most of the code should get activated, some times if we are running the code in VM which is allocated with less memory. R/W operation, RAM, free space all these maters while activating the feature from VS. If we have such environment its better to increase the default value of 120 sec to 300 sec(its not mandatory to give 300 sec this worked in my case :)), we can choose any suitable time interval to fix this problem.
Now will provide the steps to change the registry key value.
1) Open Registry editor with admin privilege
2) [HKEY_CURRENT_USER\Software\Microsoft\VisualStudio\10.0\SharePointTools]
3) Create New Keyword(DWORD) called ChannelOperationTimeout
4) Set the value to 300(it will be in second)
5) If the key is already present then we need to just update the value.
6) Save the value
7) Restart the machine, since we are updating the Registry value.
Now if we deploy the solution from VS it should work without any error.
Root cause of the issue: Server memory, Disk space, R/W disk